Maintenance: String Replacement
by D. J. Law
All harpsichordists know, strings occasionally break.
They do this for a few reasons, the most frustrating of which (especially for someone new to owning a harpsichord) is tuning the string next to the one you are sounding; and yes, we’ve all done it. Other reasons are: in the case of brass wire, old age (brass hardens with time) or the string winding at the wrest pin grinding its way into the wrestplank – there should be a bit of a gap between coil and plank but this is diminished with repeated tuning or by tapping the pin in to be firmer; and strings do break for absolutely no apparent reason.
Harpsichord Wires
You should know what wires are on your harpsichord, and their diameters. However not all makers give this information with the instrument, or the information has been mislaid. Measuring the diameter of adjacent strings is often necessary. Identifying the material is essential, because most modern instruments made before 1980 are designed to use steel music wire in the treble, sometimes at tensions impossible for authentic reproduction iron wires to withstand. In the period up to about 1980 the steel treble strings were accompanied by modern brass and for the extreme bass sometimes phosphor bronze or even beryllium copper was used. Re-introduction of authentic wire is now almost universal; the iron is softer than steel, and the less pure brasses, yellow and red, are far stronger than the earlier alternatives. Most makers and technicians should be able to make an informed guess about what was used from knowing who made the instrument and when.
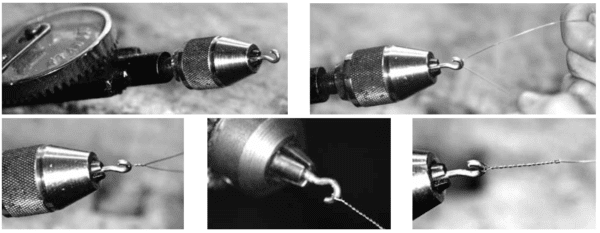
Wires need loops made to hook onto the hitchpins. Making these is a skill. I have strung many instruments using a curtain-wire hook in the chuck of a hand-drill, which was mounted in a vice and turned by a helper, or held between the feet and turned with one hand while holding the wire in pliers with the other – not recommended for anything but steel wire. I’d hate to have to make loops this way now, and in any case this can’t be done with brass, or reproduction iron wires, since they will work harden and break.
It is better is to buy wires properly looped by a maker. I use a hook in a chuck fitted to a geared motor running at around 18rpm, controlled by a foot switch. It is important that the loop is made without stressing the wire too much, so the wire, while being twisted, is allowed also to twist about its own axis; this takes practice. There is also an ugly short self-locking loop that is easier to do, found on some kit harpsichords. You should really use the style that has been used for the other strings.
Equally it is important to treat the wire with great care in order that no kinks are formed while fitting the string. Any kink will be audible as an odd uncertain flavour to the sound which does not make tuning very easy, and never goes away. The wire should have no twists along its length either; they too can be heard, so fit the loop to the hitchpin and run the wire through the fingers past the wrestplank to allow any twists to un-twist .
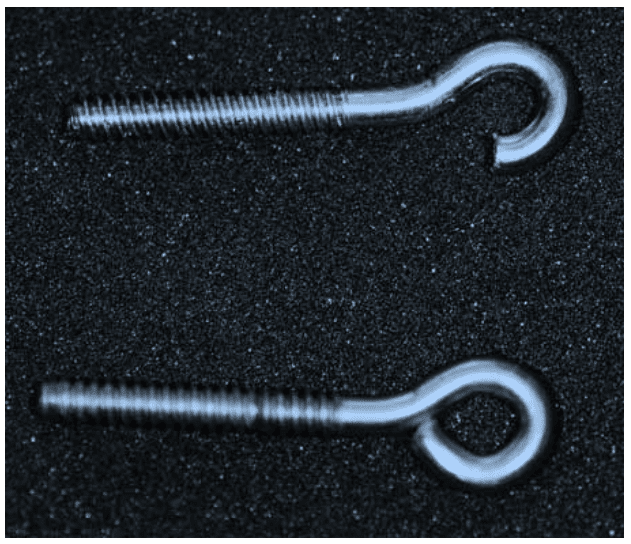
There is little consistency regarding tuning pins. Most of the “revival” harpsichords have “zither” pins. These are around 4.75mm (3/16”) in diameter, rather larger than those used on antique harpsichords, and have square heads; these are cross drilled for the string, and have a lightly milled “thread” on the bit you don’t see, which means that you can extract them by turning them anti-clockwise with the tuning key, although it takes ages.
Old instruments have the head formed by flattening with hammer blows, and the shafts (which vary in diameter from about 3.5mm to a maximum of 4.5mm) are usually but not always tapered where the pin enters the wrest plank. Two or three diameters are often found across the compass, the larger used in the bass. Good reproduction instruments will use similar pins. Removing them can be tricky. There is no threading to help you; tapered pins usually come out more easily than parallel ones, but both sometimes resist the “twisting and pulling at the same time” technique using the tuning key. A small pair of “mole” grips with the serrations smoothed off is much safer than using pliers, since they are less prone to slip off the pin —something to be avoided.
Harpsichord Pins
The pins on old instruments are not drilled: as soon as the iron used for the pins was pure enough to be largely free of hard unexpected inclusions, and as soon as drill bits were tough enough at these small sizes, pins were drilled, but it was not common practice until just before the nineteenth century, with the factory production of pianos. The soft wire used for harpsichords holds easily with no hole in the pin, but most pins available commercially now will be drilled. Many makers still make their own pins and mostly these are not drilled.
Pins can become too loose; each restring with any parallel-sided pin making the fit a little looser, and although the tensions of strings are not high (2-7 kgf), a pin that is too loose is as difficult to tune as one that is too tight. Such a pin can be safely tightened by slipping thin card, 1-2 mm wide, down the hole as you refit the pin; you must ensure the card is left or right of the pin. A technician may use very slender strips of wood, sometimes with a smear of glue, as a more permanent solution. On an antique instrument, a few drops of dilute glue size may swell the wood and do the job. I have used dilute Titebond on a modern instrument that had loads of slips of paper alongside the pins, and upon restringing, the pins were a nice fit once more.
When the string loop has been fitted to the hitchpin, slight tension must be kept on the string all the while you are fitting it to the pin; longitudinal twists must not be present, so the wire is held gently in the fingers near the hitchpin and drawn along the wire so that any twists are allowed to disappear. Iron or steel should at the same time be wiped, so use a small bit of cloth in the fingers.
Some few people are unfortunate in that their skin exudes something that instantly corrodes wires; if you are afflicted you have to wear cotton gloves. I once was visited by someone who loved to touch things and he ran his hand across the entire stringband of a new instrument. Within a few minutes, a series of black lines appeared across the nice shiny new strings, which had to be polished out immediately; it’s something to do with ammonia. Brass instruments of antiquity can sometimes be strong enough to be played when found but others cannot be removed safely from the earth; an archaeologist told me that the failures were unfortunate enough to be buried where the chicken run had been.
The Practical Bit
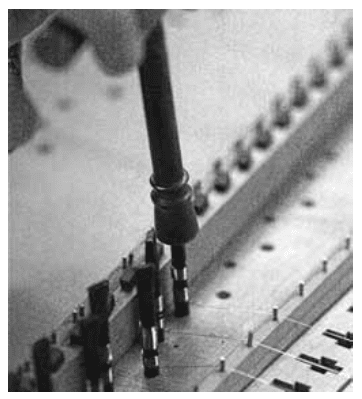
OK. That’s the introduction over. Now for the practical bit. You need tools: a tuning key and if the key has no metal strikers on the ends of the handle (hence the alternative name “tuning hammer”) you will need a hammer too, a small one is okay if you are sure of your aim, since little force is required, but one with a medium sized head makes it more difficult to miss the pin. A pair of small wire cutters are useful, and quite essential (as are a pair of 5” pliers, the teeth in the jaws having been smoothed carefully) if you are having to fit steel wire, and if you are making your own loops on any wire. For removing stiff tuning pins, a small pair of prepared mole grips will be useful. Have the hammer where you can reach it, not on the floor or the other side of the room, since you will need it to hand while you are keeping tension on the wire and the coils around the tuning pin.
So you have a broken string; first remove the jack rail. Locate and remove the bit of wire that used to be attached to the hitchpin. Find the tuning pin and remove the string still attached to it, if it still is; pulling the free end straight up works well. Now remove the pin: If the pin is square headed, turn the pin anti-clockwise using the tuning key; the thread is extremely fine so this will take a while, but the pin will come out. If the pin has an oblong head, try the same technique at first, but as you turn the pin, exert an upwards pull while turning.
This may work; in most cases it does. If this doesn’t seem to work, try turning the pin to and fro as you pull upwards, but on no account lean the pin sideways or back and front — wrestplanks are wood and the pin being steel will elongate the hole if you do this. The weapon of last resort is the pair of mole grips, fastened in line with the axis of the pin. Twisting gently to and fro while pulling upwards will always work. Set the pin aside. Determine the thickness of replacement wire either from the list you have or by asking advice of a maker or technician, or simply measure an adjacent wire if you have access to a vernier or a micrometer. Now uncoil the new wire carefully. Putting a kink in the new string is not an option. If you do fit such a wire and the kink is in the sounding length of the string, you will hear the funny sound all the time, while tuning and while playing, until you succumb and put another string on. Hook the loop onto the hitchpin. Carefully uncoil the wire, pulling it gently as you get back to the keyboard end and pick up the tuning pin. Now you need to estimate how much string you need to coil around the pin before popping the pin back into the hole. Try to make the coiling match the rest; for a zither pin, each turn needs about 15mm of wire so if the other pins seem to have ten coils you will need 150mm; thread the wire end through the hole in the pin and hold the pin about that 150mm beyond the hole, holding the pin horizontally with the square end to the treble, to your right.
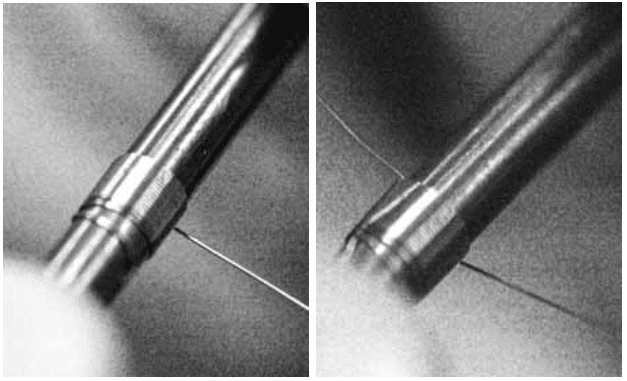
Bend the wire at right angles so that it lies along the pin to your left. Now roll the pin away from you so that the wire coils onto the pin with the tuning pin rolling above the wire, keeping some tension on the wire all the time. The coils should lie neatly next to each other. Stop when you estimate you have two turns to go, and, still keeping that wire taut, pull the overlength (which has become neatly trapped under the coils) out, at right angles to the pin; wobble it to and fro and it will break off neatly.
Steel wires need cutting but all others will break easily when this sort of work hardening is used. Now roll on those last few turns (leaving a gap if necessary to have the coils end 2mm above the wrestplank) until the pin reaches the hole, turn the pin to the vertical and position it in the hole.
Tension still needs to be kept on the wire, but once the pin has entered the hole you can apply enough by pushing the wire sideways with a spare finger.Reach for the hammer, (tuning or domestic), and tap the pin into the hole nearly as far as the rest, and immediately use the tuning key to tighten the string a little. Now settle the string into position around the bridge pins and tighten the string to somewhere near pitch.
Now check that the loop on the hitchpin is firmly down on the surface of the hitchpin rail, or in the case of 4’ strings, onto the soundboard, pushing gently with a small object. I use a bit of wood, usually a 3mm dowel, but a pencil will do. (Do not use a screwdriver because it can slip and mark the wood, and it can cause a mark on the surface of the loop, causing the wire to break, now or at a more inconvenient moment). Now you can bring the string into tune and tap the pin down to the correct height if necessary. The last coils must end up a millimetre or two above the wrest plank (this is true of all strings. Strings that try to bury themselves into the wrestplank over time and tuning often break, and this can be adjusted by letting those last few coils (after you break off the overlength) lie further down the pin.
A new string will stretch for a day or two, and must be repeatedly re-tuned. It’s a good idea to mark the pin to save hunting for it, either by cutting a little washer of cloth and popping it onto the pin, or use chalk on the top of the pin. Iron wires will take a week to really stabilise, brasses considerably longer; and the sound may be different to the adjacent strings for a lot longer than that as the metal changes.
Oblong-headed pins with a hole drilled for the wire are done exactly as above, but the pin is usually smaller in diameter, and longer, than the zither pin. Many more turns of wire are usually wound onto them, really just because it looks nice. You can still work out the extra length you need (number of coils x diameter of pin x 3.142) but there’s no need to be exact. The other reason for the larger coils on these pins is to make them resemble the way old harpsichords are strung., which brings us to the matter of fitting wire to pins with no convenient hole drilled. In this case the wire is held in place by friction alone and so many coils give better grip. Old tuning pins, hand-made, are rough and give good grip to a soft wire.
To fit a string to such a pin, the pin is laid along the string with the oblong head facing away from you at the point where you want to start the winding. Holding the wire firmly against the flattened bit of the pin with the right hand, and the overlength lower down the pin with the left, twist the pin to make a right angle to the wire so that the pin is in the same position as with a drilled pin, and start rolling the pin as before, trapping the spare length under the coils. It is obviously necessary to keep tension on the wire and keep the wire coiling over the overlength, and to be a contortionist at least for the first three or four turns, after which giving a sharp tug to the wire will settle the coils and “fix” the wire so that further coils can be added neatly and with ease. Ensure that you keep tension on the wire or the coil may loosen, and proceed as before.
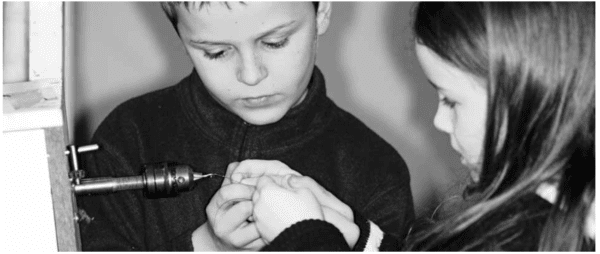
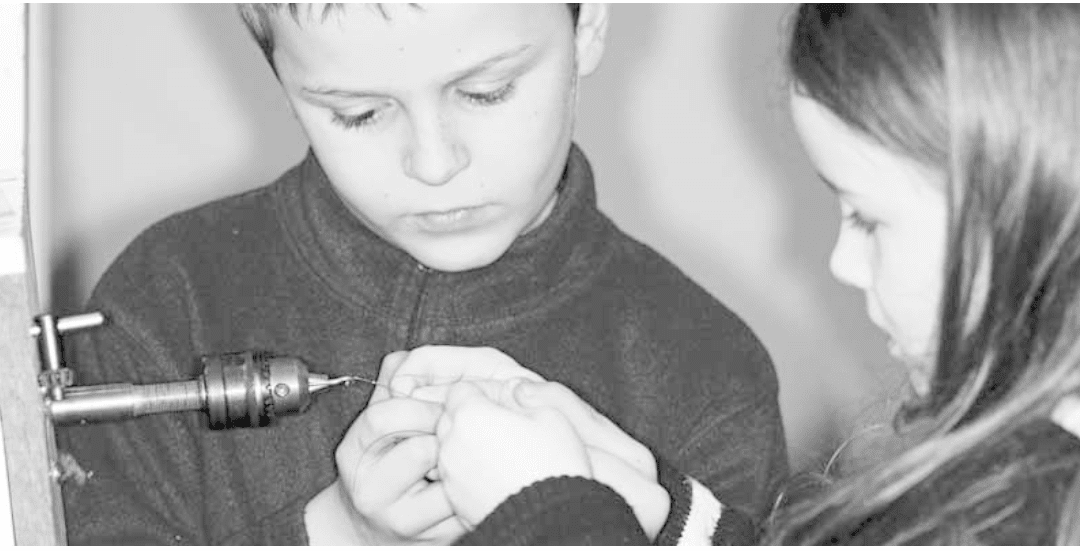
NB: Winding loops: The important thing about winding loops with reproduction strings is to allow the free ends to twist on their own axis, or the stresses may break or kink the wire before you get it on the instrument. This means cutting the length from the reel before you make the loop. This is not important when you are looping spring steel wire since it is vastly stronger; you can hold both bits together with pliers and twist away happily to form your loop; just try it with brass or iron and it will break. If you can arrange for a hook to rotate by itself, either motor-driven or by someone turning the handle of a hand-drill held in a vice, you have two hands free to hold and control the wire ends, holding them at an included angle of 60 to 90 degrees, but loosely enough for the free ends to spin if they want to.
When you have the length of winding you need, pull the long length straight and the short end out at right angles for a couple of turns, then stop and snip of the excess bit of the short end. There are hand string winders around, notably from Vogel in Germany, which have a reel holder and a clamp to hold the straight bit of the wire; you pull the free end out with your right hand while winding the handle with the left hand, the device being clamped to the cheek of your instrument. It works, but not well since the clamp is far too near the hook; the wire can twist on its own axis alarmingly unless you leave a very loose winding, which is ugly and will settle under tension for rather a long time. The hand drill plus an obedient 8-year-old works much better!
And if they can do it, you can!
Taken from Harpsichord & Fortepiano Vol 10, No.2

 I’d hate to have to make loops this way now, and in any case this can’t be done with brass, or reproduction iron wires, since they will work harden and break.
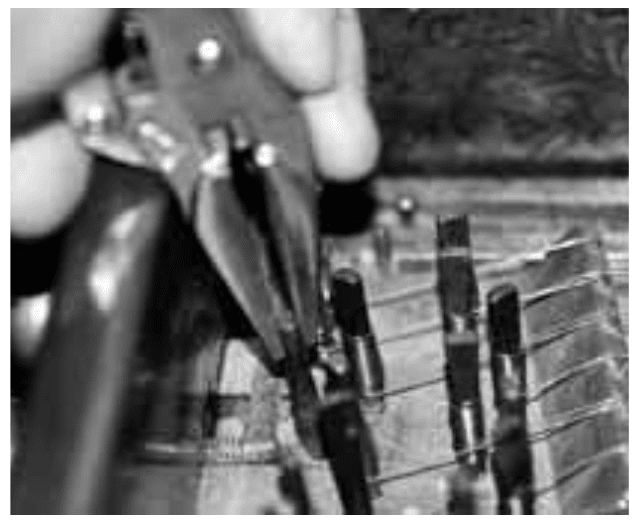 Harpsichord Pins
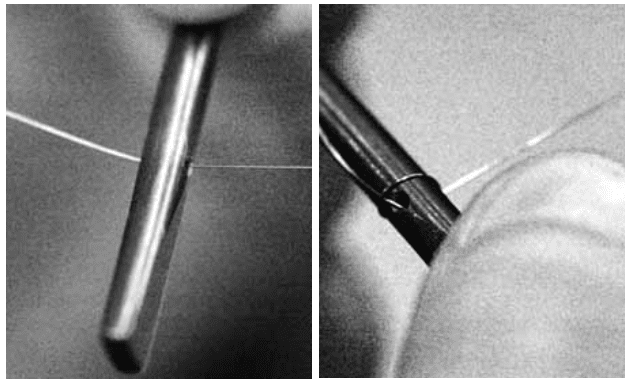
 Bend the wire at right angles so that it lies along the pin to your left. Now roll the pin away from you so that the wire coils onto the pin with the tuning pin rolling above the wire, keeping some tension on the wire all the time. The coils should lie neatly next to each other. Stop when you estimate you have two turns to go, and, still keeping that wire taut, pull the overlength (which has become neatly trapped under the coils) out, at right angles to the pin; wobble it to and fro and it will break off neatly.
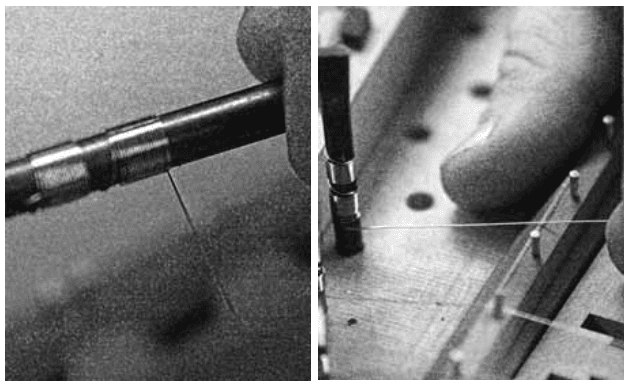 Now check that the loop on the hitchpin is firmly down on the surface of the hitchpin rail, or in the case of 4’ strings, onto the soundboard, pushing gently with a small object. I use a bit of wood, usually a 3mm dowel, but a pencil will do. (Do not use a screwdriver because it can slip and mark the wood, and it can cause a mark on the surface of the loop, causing the wire to break, now or at a more inconvenient moment). Now you can bring the string into tune and tap the pin down to the correct height if necessary.